스파르타 코딩클럽 내일배움캠프 AI 웹개발자양성과정 3회차
2022.10.26. 39일차 - TIL
1. Djnago 심화 원격강의
1) 목표
쿠키 세션 방식 로그인과 토큰 방식 로그인의 차이 이해하기쿠키와 로컬스토리지의 차이 이해하기JWT 구조 이해하기장고에서 JWT를 이용해서 회원가입과 로그인 구현하기- 브라우저의 로컬 스토리지의 토큰을 헤더에 실어서 백엔드로 보내기(마지막 프론트엔드 부분 복습)
포스트맨에서 헤더에 토큰을 실어서 백엔드로 보내기토큰의 만료기간 설정하기토큰이 만료되면 refresh token 다시 받기
2) 토큰방식 로그인 vs 쿠키세션방식 로그인
HTTP는 기본적으로 Stateless 상태이다. 즉, 서버로 가는 모든 요청이 이전 Request와 독립적으로 이루어진다는 것이다. 그래서 요청이 끝나면 서버는 유저가 누구인지 모르게 된다. 따라서 요청할 때마다 유저 정보를 알려줘야 한다. 그 과정을 인증/인가라고 한다.
인증 : 유저가 누구인지 확인하는 절차, 회원가입 및 로그인
인가 : 유저에 대한 권한을 허락하는 것
기존의 로그인은 사용자 인증 정보를 매번 Request에 담아 요청했는데, 이는 보안이 매우 취약하다. 그래서 나온 인증방식이 Session/Cookie를 이용한 로그인 방식이다.
세션/쿠키 방식 로그인이란 브라우저에 존재하는 쿠키에 Session id를 발급하여 매 요청마다 브라으조의 쿠키를 검증하여 Session id를 통해 사용자를 인증하는 것을 말한다. 이때 쿠키는 그저 Session id를 전달하기 위한 매개체일 뿐이다.
세션 : 서버에서 가지고 있는 정보
쿠키 : 사용자에게 발급된 세션을 열기 위한 열쇠
쿠키만으로 인증할 경우 서버의 자원을 사용하지 않기 때문에 클라이언트가 인증 정보를 책임져야 한다. 그렇게 되면 HTTP 요청을 탈취당할 경우 보안상 위험이 크다. 또한 세션을 이용해 iOS, Android 앱을 만들 수 있지만 쿠킨는 브라우저에만 있기 때문에 이럴 경우 '토큰'을 사용해 로그인을 진행하게 된다.
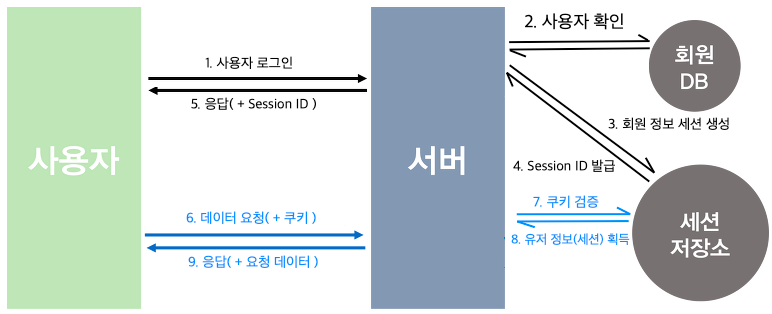
토큰 방식은 Session/Cookie 방식과 유사하게 사용자는 Access Token(JMT 토큰)을 HTTP 헤더에 실어 서버로 보내게 된다. 세션/쿠키 인증 방식이 쿠키를 발급할 때마다 회원 DB에 접근해 확인해야 하는 절차가 필요하지만, 토큰은 그 자체로 인증효과가 있기 때문에 검증만 하면 된다.
3) 로컬 스토리지 vs 쿠키
로컬 스토리지와 쿠키의 특징들을 정리하면 다음과 같다.
쿠키
- 매번 Request에 실려서 보내야 한다. -> 매 HTTP 요청마다 포함되어 API 호출로 서버에 부담
- Key와 Value 형태의 저장소이다.
- 만료가 있다.
- 암호화 X
- 설정이 어렵다.
로컬 스토리지
- Key와 Value 형태의 저장소이다.
- 용량이 크다.
- 브라우저를 닫더라도 데이터 유지
- 만료가 없다.
- API 설정이 쉽다.
4) DRF에서 JWT(JSON Web Token) 사용하기(simplejwt)
일단 필요한 것들을 설치한다.
$ pip install django rest_framework djangorestframework-simplejwt그리고 simple JWT를 settings.py 추가한다.(INSTALLED_APPS에 필요한 부분도 추가한다...)
REST_FRAMEWORK = {
	'DEFAULT_AUTHENTICATION_CLASSES': (
    	'rest_framework_simplejwt.authentication.JWTAuthentication',
    )
}
simple JWT의 라우터를 위한 urls.py도 작성한다.
from rest_framework_simplejwt.views import (
	TokenObtainPairView,
    TokenRefreshView,
)

urlpatterns = [
	path('api/token/', TokenObtainPairView.as_view(), name='token_obtain_pair'),
    path('api/token/refresh/', TokenRefreshView.as_view(), name='token_refresh'),
]
5) JWT 정보 확인하기
우리가 올바른 username과 password 값을 JSON으로 전달하면 refresh token과 access token이 반환된다. 각각의 token은 Header와 Payload, Signature 부분으로 이루어져 있고, 반환되어 우리가 볼 수 있는 token은 이 값들을 해쉬로 암호화한 문자열이다. 일반적으로 헤더에는 해쉬를 위해 사용된 함수 정보, 페이로드에는 암호화 하고자 하는 정보, 시그니처에는 헤더에 정의된 알고리즘을 통해 암호화한 비밀값이 저장된다.
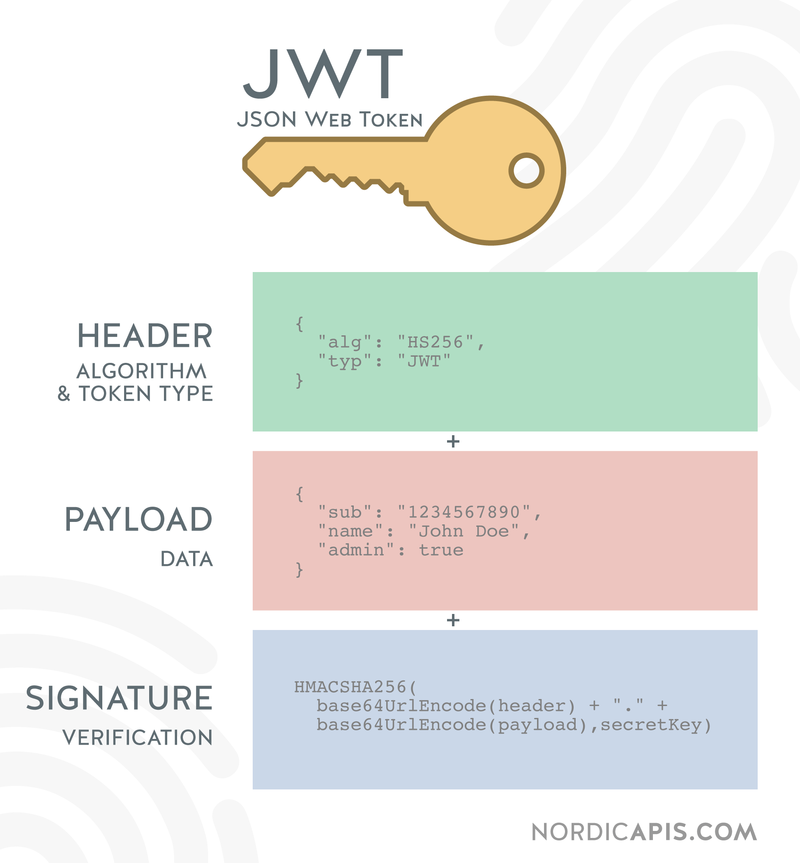
이때 일반적으로 헤더와 페이로드는 인코딩일 뿐 암호화가 아니기 때문에 누구나 디코딩하여 확인할 수 있다. 하지만 시그니처는 토큰 해쉬를 위한 SECRET_KEY를 알지 못하면 복호화할 수 없다. 시그니처를 검사해 유효한 토큰인지 확인한다.
6) custom user 만들고 등록하기
AbstractUser은 Django에서 자유도가 가장 높은 커스텀 유저 모델이다. 유저 매니저는 유저 생성, 슈퍼 유저 생성 등과 관련된 정보를 관리한다.
from django.db import models
from django.contrib.auth.models import (
    BaseUserManager, AbstractBaseUser
)


class UserManager(BaseUserManager):
    def create_user(self, email, date_of_birth, password=None):
        """
        Creates and saves a User with the given email, date of
        birth and password.
        """
        if not email:
            raise ValueError('Users must have an email address')

        user = self.model(
            email=self.normalize_email(email),
            date_of_birth=date_of_birth,
        )

        user.set_password(password)
        user.save(using=self._db)
        return user

    def create_superuser(self, email, date_of_birth, password=None):
        """
        Creates and saves a superuser with the given email, date of
        birth and password.
        """
        user = self.create_user(
            email,
            password=password,
        )
        user.is_admin = True
        user.save(using=self._db)
        return user


class User(AbstractBaseUser):
    email = models.EmailField(
        verbose_name='email address',
        max_length=255,
        unique=True,
    )
    is_active = models.BooleanField(default=True)
    is_admin = models.BooleanField(default=False)

    objects = UserManager()

    USERNAME_FIELD = 'email'
    REQUIRED_FIELDS = []

    def __str__(self):
        return self.email

    def has_perm(self, perm, obj=None):  #true인 사용자에게 명명된 권한이 있는지 여부를 반환
        "Does the user have a specific permission?"
        # Simplest possible answer: Yes, always
        return True

    def has_module_perms(self, app_label):  #true인 사용자에게 지정된 앱의 모델에 액세스할 수 있는 권한이 있는지 여부 반환
        "Does the user have permissions to view the app `app_label`?"
        # Simplest possible answer: Yes, always
        return True

    @property
    def is_staff(self):  #true인 사용자가 관리 사이트에 액세스할 수 있는지 여부 반환
        "Is the user a member of staff?"
        # Simplest possible answer: All admins are staff
        return self.is_admin
이때 해당 유저 모델을 사용하기 위해 settings.py에 다음 코드를 추가한다.
AUTH_USER_MODEL = 'users.User'하지만 사용자 정보를 생성해 db에서 확인해보면 패스워드가 그대로 노출되는 것을 확인할 수 있다. 패스워드 보안과 관련되서는 다음 항목을 따른다.
7) custom user 어드민 만들기
users 앱의 admin.py를 다음과 같이 입력한다. 자세한 내용은 공식문서를 참고하자.
from django import forms
from django.contrib import admin
from django.contrib.auth.models import Group
from django.contrib.auth.admin import UserAdmin as BaseUserAdmin
from django.contrib.auth.forms import ReadOnlyPasswordHashField
from django.core.exceptions import ValidationError

from users.models import User


class UserCreationForm(forms.ModelForm):
    """A form for creating new users. Includes all the required
    fields, plus a repeated password."""
    password1 = forms.CharField(label='Password', widget=forms.PasswordInput)
    password2 = forms.CharField(label='Password confirmation', widget=forms.PasswordInput)

    class Meta:
        model = User
        fields = ('email')

    def clean_password2(self):
        # Check that the two password entries match
        password1 = self.cleaned_data.get("password1")
        password2 = self.cleaned_data.get("password2")
        if password1 and password2 and password1 != password2:
            raise ValidationError("Passwords don't match")
        return password2

    def save(self, commit=True):
        # Save the provided password in hashed format
        user = super().save(commit=False)
        user.set_password(self.cleaned_data["password1"])
        if commit:
            user.save()
        return user


class UserChangeForm(forms.ModelForm):
    """A form for updating users. Includes all the fields on
    the user, but replaces the password field with admin's
    disabled password hash display field.
    """
    password = ReadOnlyPasswordHashField()

    class Meta:
        model = User
        fields = ('email', 'password', 'is_active', 'is_admin')


class UserAdmin(BaseUserAdmin):
    # The forms to add and change user instances
    form = UserChangeForm
    add_form = UserCreationForm

    # The fields to be used in displaying the User model.
    # These override the definitions on the base UserAdmin
    # that reference specific fields on auth.User.
    list_display = ('email', 'is_admin')
    list_filter = ('is_admin',)
    fieldsets = (
        (None, {'fields': ('email', 'password')}),
        ('Permissions', {'fields': ('is_admin',)}),
    )
    # add_fieldsets is not a standard ModelAdmin attribute. UserAdmin
    # overrides get_fieldsets to use this attribute when creating a user.
    add_fieldsets = (
        (None, {
            'classes': ('wide',),
            'fields': ('email', 'password1', 'password2'),
        }),
    )
    search_fields = ('email',)
    ordering = ('email',)
    filter_horizontal = ()


# Now register the new UserAdmin...
admin.site.register(User, UserAdmin)
# ... and, since we're not using Django's built-in permissions,
# unregister the Group model from admin.
admin.site.unregister(Group)
8) 회원가입과 로그인을 위한 urls.py와 views.py
일단 users앱의 urls.py에 url을 추가한다.
from users import views
from rest_framework_simplejwt.views import (
	TokenObtainPairView,
    TokenRefreshView,
)

urlpatterns = [
	path('signup/', views.UserView.as_view(), name='user_view'),
	path('api/token/', TokenObtainPairView.as_view(), name='token_obtain_pair'),
    path('api/token/refresh/', TokenRefreshView.as_view(), name='token_refresh'),
]
view를 작성하기 전 serializer.py를 먼저 작성해주자.
from rest_framework import serializers
from users.models import User

class UserSerializer(serializers.ModelSerializer):
	class Meta:
    	model = User
        fields = "__all__"

    def create(self, validated_data):
    	user = super().create(validated_data)  # 유효한 데이터로 사용자 생성
        password = user.password
        user.set_password(password)  # 사용자 비밀번호 해싱
        user.save()  # 해싱된 비밀번호 저장
        return user

    def update(self, validated_data):  # 사용자 정보 변경
    	user = super().create(validated_data)  # 유효한 데이터로 사용자 생성
        password = user.password
        user.set_password(password)  #사용자 비밀번호 해싱
        user.save()  # 해싱된 비밀번호 저장
        return user
마지막으로 view를 작성하면 다음과 같다.
from rest_framework.views import APIView
from rest_framework import status
from rest_framework.response import Response
from users.serializers import UserSerializer

class UserView(APIView):
	# 회원가입을 위한 post method
	def post(self, request):
    	serializer = UserSerializer(data=request.data)
        if serializer.is_valid():
        	serializer.save()
            return Response({"message": "가입완료!"}, status=status.HTTP_201_CREATED)
        else:
        	return Response({"message": f"${serializer.error}"}, status=status.HTTP_400_BAD_REQUEST)
9) JWT 페이로드 커스터마이징 해보기
access token에 사용자의 이메일 정보도 담기도록 커스터마이징을 해보자. users의 views.py에 다음 내용을 추가한다.
from rest_framework.views import APIView
from rest_framework import status
from rest_framework.response import Response
from users.serializers import CustomTokenObtainPairSerializer, UserSerializer

from rest_framework_simplejwt.views import TokenObtainPairView

class UserView(APIView):
	...

class CustomTokenObtainPairView(TokenObtainPairView):
	serializer_class = CustomTokenObtainPairSerializer
그리고 기존의 serializers.py에 다음 코드를 추가한다.
from rest_framework import serializers
from users.models import User

from rest_framework_simplejwt.serializers import TokenObtainPairSerializer

class UserSerializer(serializers.ModelSerializer):
	...

class CustomTokenObtainPairSerializer(TokenObtainPairSerializer):
    @classmethod
    def get_token(cls, user):
        token = super().get_token(user)

        # Add custom claims
        token['email'] = user.email  # 사용자 이메일을 보이게 할 거임
        # ...

        return token
마지막으로 urls.py 코드를 수정한다.
from users import views
from rest_framework_simplejwt.views import (
	TokenObtainPairView,
    TokenRefreshView,
)

urlpatterns = [
	...
	path('api/token/', views.CustomTokenObtainPairView.as_view(), name='token_obtain_pair'),
    path('api/token/refresh/', TokenRefreshView.as_view(), name='token_refresh'),
]
10) 토큰주기 설정과 DRF에서 권한 설정하기
settings.py에 다음을 추가한다. 처음이라 다 적었지만 나중에는 필요한 부분만 적으면 된다. 이때 'ACCESS_TOKEN_LIFETIME'의 값을 원하는 로그인 유지 시간으로 바꾸어주면 된다.
from datetime import timedelta
...

SIMPLE_JWT = {
    'ACCESS_TOKEN_LIFETIME': timedelta(minutes=5),
    'REFRESH_TOKEN_LIFETIME': timedelta(days=1),
    'ROTATE_REFRESH_TOKENS': False,
    'BLACKLIST_AFTER_ROTATION': False,
    'UPDATE_LAST_LOGIN': False,

    'ALGORITHM': 'HS256',
    'SIGNING_KEY': SECRET_KEY,
    'VERIFYING_KEY': None,
    'AUDIENCE': None,
    'ISSUER': None,
    'JWK_URL': None,
    'LEEWAY': 0,

    'AUTH_HEADER_TYPES': ('Bearer',),
    'AUTH_HEADER_NAME': 'HTTP_AUTHORIZATION',
    'USER_ID_FIELD': 'id',
    'USER_ID_CLAIM': 'user_id',
    'USER_AUTHENTICATION_RULE': 'rest_framework_simplejwt.authentication.default_user_authentication_rule',

    'AUTH_TOKEN_CLASSES': ('rest_framework_simplejwt.tokens.AccessToken',),
    'TOKEN_TYPE_CLAIM': 'token_type',
    'TOKEN_USER_CLASS': 'rest_framework_simplejwt.models.TokenUser',

    'JTI_CLAIM': 'jti',

    'SLIDING_TOKEN_REFRESH_EXP_CLAIM': 'refresh_exp',
    'SLIDING_TOKEN_LIFETIME': timedelta(minutes=5),
    'SLIDING_TOKEN_REFRESH_LIFETIME': timedelta(days=1),
}
이제 로그인을 확인해보기 위해 views.py에 다음 코드를 추가한다.(마찬가지로 알맞게 urls.py도 고치자)
from rest_framework.views import APIView
from rest_framework import status
from rest_framework.response import Response
from users.serializers import CustomTokenObtainPairSerializer, UserSerializer

from rest_framework_simplejwt.views import TokenObtainPairView

class UserView(APIView):
	...

class CustomTokenObtainPairView(TokenObtainPairView):
	...

class mockView(APIView):
	permission_classes = [permissions.IsAuthenticated]
    def get(self, request):
    	return Response("get 요청")
이후 postman을 통해 mock에 get 요청을 보내면 Authentication credentials가 오직 안 왔다고 뜬다. 앞으로는 헤더 부분에 로그인 후 access token을 넣어주어야 한다. 이때 KEY에는 'Authorization'을, VALUE에는 'Bearer access_token값'을 넣어주고 요청을 보내면 성공적으로 response 되는 것을 확인할 수 있다.
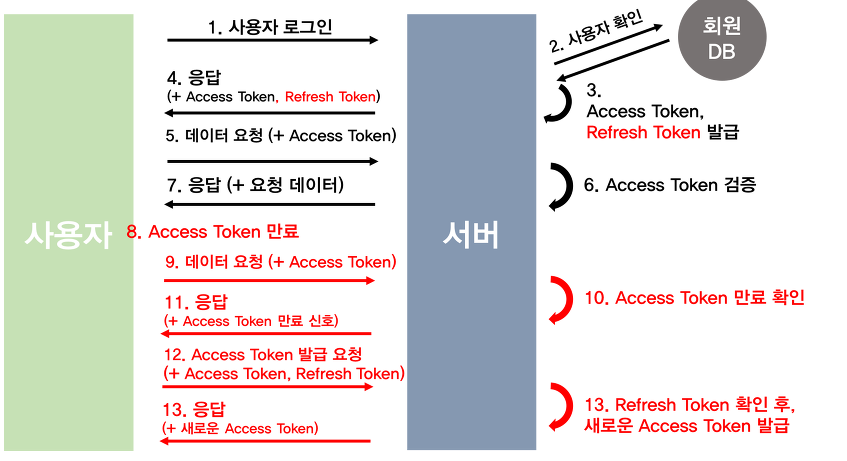
11) Refreshtoken으로 access token 받기
postman에서 '~~/api/token/refresh'에 post 방식으로 {"refresh": "로그인했을 떄 얻은 refresh_token값"}을 JSON 형식으로 전달하면 access_token을 재발급 받을 수 있다. 그러면 재발급 받은 access_tocken으로 mock api를 실행하면 로그인이 성공한다.
12) 프론트엔드 예시
13) 참고자료
로그인 방식에 대해 알아보자
이 글에서는 두가지 로그인 방식에 대해 비교하며 정리하는 방식으로 글을 작성하겠다. 먼저 필자는 최근 모바일 앱 개발에 벡엔드를 맡게 되었다. 학교 친구들끼리 하는 사이드 프로젝트이다..
velog.io
https://django-rest-framework-simplejwt.readthedocs.io/en/latest/index.html
Simple JWT — Simple JWT 5.2.1.post3+gbd4c6ce documentation
Simple JWT provides a JSON Web Token authentication backend for the Django REST Framework. It aims to cover the most common use cases of JWTs by offering a conservative set of default features. It also aims to be easily extensible in case a desired feature
django-rest-framework-simplejwt.readthedocs.io
'개발일지 > AI 캠프' 카테고리의 다른 글
| 내일배움캠프 AI - 9주차 WIL (0) | 2022.10.31 |
|---|---|
| 내일배움캠프 AI - 40일차 TIL, 2022.10.27 (0) | 2022.10.28 |
| 내일배움캠프 AI - 38일차 TIL, 2022.10.25 (0) | 2022.10.26 |
| 내일배움캠프 AI - 37일차 TIL, 2022.10.24 (0) | 2022.10.25 |
| 내일배움캠프 AI - 8주차 WIL (0) | 2022.10.23 |